Wednesday, April 18, 2012

Easy Parmesan Knots

These are easy to make because they start off with a can of refrigerated biscuit dough.  However, they look fancy because you shape the dough in a knot.  Pretty, yummy and easy.  What more could you want?  You could do the same thing with your favorite roll recipe too.  Just shape the same, bake according to your roll recipe and brush with the oil mixture.

parmesan knots 1 450
Easy Parmesan Knots
  • 1 tube (12 ounces) refrigerated buttermilk biscuits ( I used Pillsbury Golden Layers Refrigerated Buttermilk Biscuits)
  • 1/4 cup canola oil
  • 3 tablespoons grated Parmesan cheese (I did use the green can stuff)
  • 1/2 teaspoon garlic powder
  • 1 teaspoon dried oregano
  • 1 teaspoon dried parsley flakes
  1. Roll each biscuit into a 12-in. rope and tie into a knot; tuck ends under. Place 2 in. apart on a greased baking sheet. Bake at 400° for 8-10 minutes or until golden brown.
  2. In a large bowl, combine the remaining ingredients; brush the warm knots with the mixture. Yield:10 knots
http://realmomkitchen.com/609/easy-parmesan-knots/

Tuesday, April 17, 2012

Chicken & Spinach Pasta Bake

If you are here from Pinterest, please follow my boards here–would love to share with you on my latest addiction!!
I must tell you, this is one of my favorite dishes to make when we’re having company over.  It’s tried & true and from the kitchen of my blog partner, Jessica, of course.  I love this dish for company because you can cook & chop the chicken as well as cutting up several other ingredients in advance plus it has beautiful presentation.  Added bonus: I frequently get asked for the recipe.  Hope you all enjoy this dish, too!

Chicken & Spinach Pasta Bake

  • 8 oz uncooked rigatoni
  • 1 T olive oil
  • 1 c chopped onion
  • 1 (10 oz) pack frozen spinach, thawed
  • 3 c cubed, cooked chicken breasts
  • 1 (14 oz) can Italian-style diced tomatoes, drained
  • 1 (8 oz) container Philadelphia chive & onion cream cheese
  • ½ t salt, ½ t pepper
  • 1½ c shredded mozzarella cheese
Prepare rigatoni according to pkg directions.  Spread oil on bottom of 11×17 in baking dish; add onion in a single layer.  Bake at 375 for 15 minutes or just until tender.  Transfer onion to large bowl, set aside.
Drain chopped spinach well, pressing between paper towels.  Stir in rigatoni, spinach, chicken, & next 4 ingredients into onion in bowl.  Spoon mixture into dish & sprinkle evenly with shredded mozzarella cheese.  Bake covered at 375 for 30 minutes; uncover & bake 15 more minutes or until bubbly.

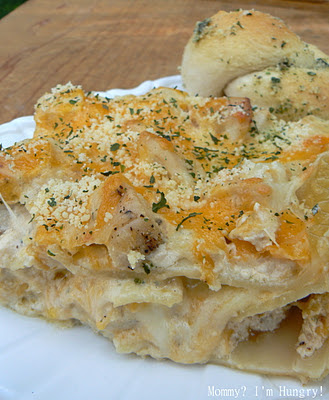
Cheesy Chicken Ranch Lasagna

Next time I make this I'll used cooked penne pasta (not the full box) and do a casserole with it. I served this with Garlic Knots (Pinterest also, and with those next time I'd use my own roll dough recipe, and for the topping use melted butter, garlic and parsley) and green beans.


Cheesy Chicken Ranch Lasagna
Adapted from Real Mom Kitchen

2 (12 oz) cans evaporated milk
1 (1 oz) pkg. Hidden Valley dry Salad Dressing & Seasoning Mix (not the dip blend)
3 C. cubed, cooked, chicken
1/8 tsp pepper
1 (16oz) lasagna noodles, cooked (I used 9 noodles)
1 1/2 to 2 C cheddar cheese, grated
1 1/2 to 2 C mozzarella cheese, grated

Combine evaporated milk and Ranch dressing and pepper in a 3 quart heavy saucepan. Heat over low heat, stirring frequently until dry ingredients are dissolved. Simmer, uncovered, 25 minutes, stirring frequently. Sauce will thicken slightly.  Layer half of lasagna noodles, chicken, sauce, and cheese in well-greased 9×13 pan. Repeat layers again. Bake at 350 for 35-40 minutes or until hot and bubbly. Let rest 10 minutes before serving.

This sauce may curdle on you when heating it, it's OK. Mine did not, because I kept it at a low heat after I let it come to just a boil, and stirred, stirred, stirred. You may not need the full 25 minutes, so when you can tell it's starting to thicken, it's OK to add to the dish. It may curdle after it's baked, but again, it's OK.

 
FOR A GLUTEN FREE CASSEROLE STYLE:
(for non GF, use regular pasta)

2 (12 oz) cans evaporated milk
1 (1 oz) pkg. Any Gluten Free Dry Ranch Salad Dressing (not the dip blend)
3 C. cubed, cooked, chicken (about 2 large chicken breasts)
1/8 tsp pepper
2-3 C. uncooked gluten free penne pasta
1 C cheddar cheese, grated
1 C mozzarella cheese, grated

Spray a 9x13 baking dish. Cook pasta until about 2 minutes under regular cook time (probably about 5-6 minutes). Drain, add to prepared dish.
Combine evaporated milk and Ranch dressing and pepper in a 3 quart heavy saucepan. Heat just to a boil then lower heat, stirring frequently until dry ingredients are dissolved. Simmer, uncovered, 25 minutes, stirring frequently. Sauce will thicken slightly.
Layer pasta, chicken, sauce, and cheese into dish.  Bake uncovered at 350' for 25 minutes or until hot and bubbly.
Let rest 10 minutes before serving.
Chicken Parmesan Wraps

Egg roll and wanton wrappers are unbelievably versatile. From buffalo chicken rolls, to petite lasagnas to pastry puffs, the list goes on and on!  I don’t know about you, but I always seem to draw a blank when it comes to new and different appetizers, so this week, I’ve discovered an amazing recipe for Chicken Parmesan Wraps on Can You Stay For Dinner-who doesn’t like chicken parmesan?  Best part about this recipe, it’s a total crowd pleaser, and most importantly, it’s so simple!
Chicken Parmesan Wraps
Gather Up:
8 oz raw chicken breast
1 cup marinara sauce, plus more for serving
6 egg roll wrappers (each 7 inches squared)
1 cup baby spinach leaves
1/2 cup mozzarella cheese
1/4 cup Parmesan cheese
Instructions:
Place the chicken breast in a small pot and fill with enough water just to cover. Bring to a boil on your stove top, reduce the heat slightly, then simmer for about 12 minutes, or until cooked through. Drain and let cool before shredding with two forks, pulling against the grain of the meat. Mix the meat with the marinara sauce in a small bowl.
Preheat the oven to 400 degrees F. Lay the egg roll wrappers on a clean work surface. Layer each with a few leaves of spinach, then chicken, followed by mozzarella and Parmesan.
Lightly brush two adjacent sides of the wrapper with water and fold the upper left corner downward, covering the filling, and press to seal on the bottom right corner. Press to seal each of the sides. Repeat with remaining wraps.
Place all 6 filled wraps on a greased wire rack set over a cookie sheet, coat each in cooking spray or a light brushing of olive oil, and bake for about 12 minutes, or until the edges begin to turn a golden brown.
Serve with warmed marinara sauce for dipping.

Thursday, April 12, 2012

Oreo Cheesecake Cupcakes


I may spend the majority of my time in the kitchen figuring out how to pack lots of vegetables, whole grains, and legumes into a simple yet flavorful dinner, but I can’t pretend that packaged food never makes an appearance in our house. There’s just something about Oreos I can’t resist, even though I know they’re full of junk.
I swear I’m not trying to make all the cupcakes out of Martha Stewart’s Cupcakes, but lately every recipe that’s jumped out at me as I scroll through dozens of food blogs happens to be from that book.
These are awesome, and if you’re at all hesitant about making cheesecakes this is a great place to start, because you get all the good qualities of a cheesecake without having to worry about cracking or water baths or springform pans. They’re easy to put together, and the hardest part is definitely waiting the four hours they need to chill (but you can speed that up by putting them in the freezer for some of the time).

Oreo Cheesecake Cupcakes
Ingredients
  • 22 Oreos: 16 left whole, and 6 coarsely chopped
  • 2 8-oz packages cream cheese, at room temperature (Neufchatel is fine)
  • 1/2 cup sugar
  • 1/2 tsp vanilla extract
  • 2 large eggs, room temperature, lightly beaten
  • 1/2 cup sour cream
  • Pinch of salt
Instructions
  1. Preheat oven to 275 F.
  2. Line 12 standard muffin tins and 4 ramekins (or 16 muffin tins, if you have them) with paper liners.
  3. Place 1 whole Oreo in the bottom of each lined cup.
  4. Beat the cream cheese in the bowl of a stand mixer on medium. Gradually beat in the sugar and vanilla.
  5. Pour in the beaten eggs, a little at a time, scraping down the sides of the bowl after each addition.
  6. Beat in the sour cream and salt.
  7. Stir in chopped cookies by hand.
  8. Pour the batter into the prepared tins, filling each almost to the top.
  9. Bake, rotating pan halfway through, until filling is set, 22-25 minutes.
  10. Cool in the pans for about 15 minutes, on a wire rack, then transfer to a plate in the refrigerator for at least 4 hours.

(adapted from 52 Cupcakes, originally from Martha Stewart’s Cupcakes)

http://catesworldkitchen.com/2010/01/oreo-cheesecake-cupcakes/

Crispy Southwest Chicken Wraps


Taken after the model of these delicious wraps, I threw these together for dinner the other night after I realized it was already 5:00 p.m. and I had nothing in the works to feed my hungry family.
They were so delicious! I was quite proud of myself for the impromptu meal that actually turned out (since usually my impromptu meals are, well, terrible). Full of flavor, these wraps are a snap to make and turn out a delightfully crunchy tortilla that is filled with rice, chicken, beans, spices and cheese. I couldn’t wait to snarf these down for lunch leftovers the next day.
I just love it when a meal happens to fit all the criteria I love: healthful, fast, delicious. Score.

Crispy Southwest Chicken Wraps
Printable Version
Printable Version with Picture

*Makes 6 wraps*
INGREDIENTS:
1 cup cooked rice, warm or at room temperature
1 cup cooked, shredded chicken
1 can black beans, rinsed and drained
1 green onion, finely sliced (white and green parts)
1/2 red or green pepper, diced
1/4 cup fresh cilantro, chopped
juice of 1 lime
1/2 tablespoon chili powder
1 teaspoon ground cumin
1/2 teaspoon garlic salt
2 cups shredded cheese (I used a combination of monterey jack and sharp cheddar)
Sour cream (optional)
6 burrito-sized flour tortillas

DIRECTIONS:
Mix rice together with chili powder, cumin and garlic salt. Add remaining ingredients except for cheese and sour cream. Sprinkle cheese over tortillas, leaving 1/2-inch border around edges, then arrange chicken and rice mixture down the center of each tortilla. (Optional: on some of the wraps, I dotted the cheese with about 1-2 tablespoons of reduced fat sour cream before arranging chicken and rice mixture down the center – it made the wraps delightfully creamy.) Roll stuffed tortillas, leaving edges open. Spray the tortillas all over with cooking spray.
Heat a large non-stick skillet (or griddle) over medium heat for 1 minute. Arrange 2 wraps, seam-side down, in pan and cook until golden brown and crisp, about 2-3 minutes per side. Transfer to a plate and repeat with remaining wraps. Serve.

http://www.melskitchencafe.com/2009/09/crispy-southwest-chicken-wraps.html

Easy Peasy Skillet Lasagna

The only thing better than a gooey lasagna is a gooey lasagna that takes half the time to make. Lasagna that is just as cheesy, noodley and down right delectable as the regular kind, just substantially easier and much lighter. Lasagna,  my dear friends, that looks a little something, like-a-this.
Sure, it’s not as pretty as stacked lagasna made with vibrant vegetables, but guys, trust me when I say this, it’s JUST as savory, creamy, decadent and delicious.
If not more.
In addition to being oh-so-yummy, this skillet lasagna is lighter than most, completely vegetarian AND has only 7 Weight Watchers Points Plus points! For a gal who only gets 26 points a day, this is a god-send.
Plus, wine has 4 points, so you know that’s being calculated in there too. So technically, I only have 22 points a day.
So when I find meals like this that are SO mouth-watering you are thinking “and here’s another 6 pounds” with each bite for LESS THAN 8  points per hearty cup? I’m going to jump up and down and do my white-mom dance.
Maybe someday I’ll let you all be privy to my dance moves. Some have called it a mix between an outdated soccer mom & Elaine from Seinfeld. Don’t be intimated by that, though.

Easy Peasy Skillet Lasagna


Serves 4
Prep time: 10 minutes
Cook time: >10 minutes
Recipe adapted from Weight Watchers One Pot cookbook.

Ingredients:

  • 1 1/2 tablespoons extra virgin olive oil
  • 1 large onion, chopped
  • 1 cup mushrooms, chopped
  • 2 garlic cloves, minced
  • 2 (14.5 oz) cans Italian diced tomatoes, drained
  • 1/4 cup tomato sauce
  • 3 basil leaves, chopped
  • 1/4 teaspoon black pepper
  • 1 teaspoon sea salt
  • 1/2 cup skim ricotta cheese
  • 1/2 cup part skim mozzarella cheese
  • 3 tablespoons Parmesan cheese
  • About 6 ounces lasagna noodles, broken into thirds & fully cooked
  • 2 tablespoons parsley (dried or fresh)

Directions:

  1. Heat oil in a large nonstick skillet over medium-high heat. Add onions and cook until softened, about 4 minutes. Add garlic and mushrooms and cook until garlic is fragrant, about one minute. Add in diced tomatoes, tomato sauce, basil, salt and pepper. Cook mixture until it thickens up a bit, around 5 minutes.
  2. Add noodles to skillet and stir into the mixture well. Add scoops of ricotta cheese over the noodles; add in mozzarella and Parmesan. Stir in parsley.  Cook about 2 more minutes, or until mixture is thick.
  3. Serve immediately with additional basil or parsley.
I love living in a world where I can eat this, THIS cheesy wonder before me, have a glass of wine AND STILL LOSE WEIGHT. I’ll say, Weight Watchers, you get a fist pump for that.

Nutritional information per 1 cup: 

Calories: 275
Fat: 3 grams
Carbohydrates: 42 grams
Fiber: 9 grams
Protein: 15 grams
Weight Watchers Points Plus Points: 7

http://nutritionfor.us/2012/02/eat-skinny-be-skinny-easy-peasy-skillet-lasagna/

Friday, April 6, 2012

Cream Cheese Chicken Enchiladas

Cream Cheese Greatness

I found this recipe a while back and printed it out with the intentions of making it that night.  Well, I guess I didn't get around to it and somewhere along the way I lost the recipe and couldn't remember where I even found the original!  I guess I must have used it as a bookmark when I was reading my latest issue of US magazine because that's where I found it a few weeks later!  HA!!!  I wish I knew who to give credit to for this recipe, but for the life of me I can't remember where I found it.  They said it would be good, but that was an understatement...these enchiladas are TO DIE FOR!!!!!!!!!!
TO-DIE-FOR CREAM CHEESE CHICKEN ENCHILADAS
2-3 chicken breasts, shredded {OR rotisserie chicken}
1 {8 oz.} pkg. cream cheese
1 28 oz. can green enchilada sauce {I used Las Palmas}
1 can black beans, drained & rinsed
2 cups cooked rice {I used boil in a bag because I can't cook rice to save my life!!!}
Tortillas {I used Mission flour tortillas, but homemade would be muy delicioso!}
1-2 cups shredded monterrey & colby cheese
Cook chicken and shred; boil rice.  Mix the shredded chicken, cream cheese, and 2 cups of the enchilada sauce together.  This mix makes A TON!!!!
creamcheeseenchiladas2
Pour half a cup of the enchilada sauce into the bottom of a 9x13 baking dish. 
creamcheeseenchiladas1 creamcheeseenchiladas3
Layer the rice & black beans to your taste…
creamcheeseenchiladas4

and top with the chicken mixture in each tortilla.
creamcheeseenchiladas6
Roll up each of the tortillas and place them in the baking dish seam side down. 
creamcheeseenchiladas7
Top with 1 cup of the enchilada sauce…  
creamcheeseenchiladas8
and 1-2 cups of shredded cheese.  The more, the merrier so we piled on the full two cups :)
creamcheeseenchiladas9
Cover the baking dish with foil and bake at 375 for about 25 minutes.
creamcheeseenchiladas10
Uncover the enchiladas, turn on the broiler, and broil for about 3-5 minutes uncovered...just long enough to brown the cheese.  Swoon.
creamcheeseenchiladas11
Y'all...these are honest to goodness downright AMAZING!!!!  I could eat these every night and be happy as a clam!  SO good!!!  Like I said before, this mixture makes A LOT of enchiladas.  These would be GREAT to serve if you were having a dinner party or bringing dinner to someone.  If you do decide to make these for a dinner party, pick up an extra can of the enchilada sauce to spread on the baking pan & on top of the enchiladas with each batch you bake. 
creamcheeseenchiladas13 creamcheeseenchiladas12
RUN to your nearest grocery store and pick these ingredients up as soon as you can!!!

http://pearls-handcuffs-happyhour.blogspot.com/2010/05/cream-cheese-greatness.html

Thursday, April 5, 2012

Strawberries ‘n’ Cream Trifle

So this beautiful weather is making me crave summer foods (OK…I know it’s only in the 60’s, but that is warm after a LONG Michigan winter!) One of my favorite desserts/snacks in the spring/summer time is my strawberry trifle! It is so easy to make, (it literally takes about 10 minutes to prepare) and it ends up looking like you spent hours making it! I like to bring it to parties/get together’s, and it always gets rave reviews and is gone in minutes!
trifle

You can vary the recipe in so many ways by using different berries or pudding flavors.  You could try adding your favorite combination of flavors, like blueberries with lemon pudding, or strawberries with cheesecake pudding (and you could even garnish with graham cracker crumbs!)  I made a gingerbread/pumpkin version of this trifle for our Christmas party this year, and it was gone before any of the cookies or pies were even touched! (And little did everyone know, it was much healthier!)  So try this recipe the next time you are entertaining, or just want a light creamy dessert!

Ingredients

  • 1 Package  Sugar Free/Fat Free instant vanilla pudding mix (You could also try cheesecake/white chocolate/or lemon sugar free pudding instead of vanilla. You can also use regular pudding, but it will add more sugar/calories to the dish)
  • 3 Cups fat free cold milk
  • 1 Angel food cake, cut into 1 inch cubes (you could even buy a sugar free angel food cake if you are sensitive to sugar, but I find that the real thing tastes better in this dish!)
  • 1 (16 ounce) package fresh strawberries, sliced lengthwise (or frozen strawberries, thawed and sliced lengthwise)
  • 1 (12 ounce) container light frozen whipped topping, thawed
  • *Optional: Dark chocolate shavings to garnish the top!

Method

  1. Prepare pudding with milk according to package directions.
  2. To the pudding mixture, add half of the cool whip. (Set the rest of the cool whip aside to garnish on top of each trifle).
  3. Make layers in clear glass cups (or in a trifle dish/big glass bowl if you prefer) starting with the angel food cake, pudding/cool whip mix, and strawberries.
  4. Repeat until the cups (or trifle dish/bowl) are full.
  5. Garnish with the left over whipped topping, a few strawberries, and chocolate shavings (if you desire!)
  6. Cover and chill in refrigerator at least 4 hours before serving. (I find overnight works best to get all the flavors married!)

Enjoy! 

Servings:10 (1 cup servings)

Calories:135 per serving
Weight Watchers Points Plus Value: 5 Per Serving

LINK